- Blog Categories
- Project Management
- Agile Management
- IT Service Management
- Cloud Computing
- Business Management
- Business Intelligence
- Quality Engineer
- Cyber Security
- Career
- Big Data
- Programming
- Most Popular Blogs
- PMP Exam Schedule for 2024: Check PMP Exam Date
- Top 60+ PMP Exam Questions and Answers for 2024
- PMP Cheat Sheet and PMP Formulas To Use in 2024
- What is PMP Process? A Complete List of 49 Processes of PMP
- Top 15+ Project Management Case Studies with Examples 2024
- Top Picks by Authors
- Top 170 Project Management Research Topics
- What is Effective Communication: Definition
- How to Create a Project Plan in Excel in 2024?
- PMP Certification Exam Eligibility in 2024 [A Complete Checklist]
- PMP Certification Fees - All Aspects of PMP Certification Fee
- Most Popular Blogs
- CSM vs PSM: Which Certification to Choose in 2024?
- How Much Does Scrum Master Certification Cost in 2024?
- CSPO vs PSPO Certification: What to Choose in 2024?
- 8 Best Scrum Master Certifications to Pursue in 2024
- Safe Agilist Exam: A Complete Study Guide 2024
- Top Picks by Authors
- SAFe vs Agile: Difference Between Scaled Agile and Agile
- Top 21 Scrum Best Practices for Efficient Agile Workflow
- 30 User Story Examples and Templates to Use in 2024
- State of Agile: Things You Need to Know
- Top 24 Career Benefits of a Certifed Scrum Master
- Most Popular Blogs
- ITIL Certification Cost in 2024 [Exam Fee & Other Expenses]
- Top 17 Required Skills for System Administrator in 2024
- How Effective Is Itil Certification for a Job Switch?
- IT Service Management (ITSM) Role and Responsibilities
- Top 25 Service Based Companies in India in 2024
- Top Picks by Authors
- What is Escalation Matrix & How Does It Work? [Types, Process]
- ITIL Service Operation: Phases, Functions, Best Practices
- 10 Best Facility Management Software in 2024
- What is Service Request Management in ITIL? Example, Steps, Tips
- An Introduction To ITIL® Exam
- Most Popular Blogs
- A Complete AWS Cheat Sheet: Important Topics Covered
- Top AWS Solution Architect Projects in 2024
- 15 Best Azure Certifications 2024: Which one to Choose?
- Top 22 Cloud Computing Project Ideas in 2024 [Source Code]
- How to Become an Azure Data Engineer? 2024 Roadmap
- Top Picks by Authors
- Top 40 IoT Project Ideas and Topics in 2024 [Source Code]
- The Future of AWS: Top Trends & Predictions in 2024
- AWS Solutions Architect vs AWS Developer [Key Differences]
- Top 20 Azure Data Engineering Projects in 2024 [Source Code]
- 25 Best Cloud Computing Tools in 2024
- Most Popular Blogs
- Company Analysis Report: Examples, Templates, Components
- 400 Trending Business Management Research Topics
- Business Analysis Body of Knowledge (BABOK): Guide
- ECBA Certification: Is it Worth it?
- How to Become Business Analyst in 2024? Step-by-Step
- Top Picks by Authors
- Top 20 Business Analytics Project in 2024 [With Source Code]
- ECBA Certification Cost Across Countries
- Top 9 Free Business Requirements Document (BRD) Templates
- Business Analyst Job Description in 2024 [Key Responsibility]
- Business Analysis Framework: Elements, Process, Techniques
- Most Popular Blogs
- Best Career options after BA [2024]
- Top Career Options after BCom to Know in 2024
- Top 10 Power Bi Books of 2024 [Beginners to Experienced]
- Power BI Skills in Demand: How to Stand Out in the Job Market
- Top 15 Power BI Project Ideas
- Top Picks by Authors
- 10 Limitations of Power BI: You Must Know in 2024
- Top 45 Career Options After BBA in 2024 [With Salary]
- Top Power BI Dashboard Templates of 2024
- What is Power BI Used For - Practical Applications Of Power BI
- SSRS Vs Power BI - What are the Key Differences?
- Most Popular Blogs
- Data Collection Plan For Six Sigma: How to Create One?
- Quality Engineer Resume for 2024 [Examples + Tips]
- 20 Best Quality Management Certifications That Pay Well in 2024
- Six Sigma in Operations Management [A Brief Introduction]
- Top Picks by Authors
- Six Sigma Green Belt vs PMP: What's the Difference
- Quality Management: Definition, Importance, Components
- Adding Green Belt Certifications to Your Resume
- Six Sigma Green Belt in Healthcare: Concepts, Benefits and Examples
- Most Popular Blogs
- Latest CISSP Exam Dumps of 2024 [Free CISSP Dumps]
- CISSP vs Security+ Certifications: Which is Best in 2024?
- Best CISSP Study Guides for 2024 + CISSP Study Plan
- How to Become an Ethical Hacker in 2024?
- Top Picks by Authors
- CISSP vs Master's Degree: Which One to Choose in 2024?
- CISSP Endorsement Process: Requirements & Example
- OSCP vs CISSP | Top Cybersecurity Certifications
- How to Pass the CISSP Exam on Your 1st Attempt in 2024?
- Most Popular Blogs
- Best Career options after BA [2024]
- Top Picks by Authors
- Top Career Options & Courses After 12th Commerce in 2024
- Recommended Blogs
- 30 Best Answers for Your 'Reason for Job Change' in 2024
- Recommended Blogs
- Time Management Skills: How it Affects your Career
- Most Popular Blogs
- Top 28 Big Data Companies to Know in 2024
- Top Picks by Authors
- Top Big Data Tools You Need to Know in 2024
- Most Popular Blogs
- Web Development Using PHP And MySQL
- Top Picks by Authors
- Top 30 Software Engineering Projects in 2024 [Source Code]
- More
- Tutorials
- Practise Tests
- Interview Questions
- Free Courses
- Agile & PMP Practice Tests
- Agile Testing
- Agile Scrum Practice Exam
- CAPM Practice Test
- PRINCE2 Foundation Exam
- PMP Practice Exam
- Cloud Related Practice Test
- Azure Infrastructure Solutions
- AWS Solutions Architect
- AWS Developer Associate
- IT Related Pratice Test
- ITIL Practice Test
- Devops Practice Test
- TOGAF® Practice Test
- Other Practice Test
- Oracle Primavera P6 V8
- MS Project Practice Test
- Project Management & Agile
- Project Management Interview Questions
- Release Train Engineer Interview Questions
- Agile Coach Interview Questions
- Scrum Interview Questions
- IT Project Manager Interview Questions
- Cloud & Data
- Azure Databricks Interview Questions
- AWS architect Interview Questions
- Cloud Computing Interview Questions
- AWS Interview Questions
- Kubernetes Interview Questions
- Web Development
- CSS3 Free Course with Certificates
- Basics of Spring Core and MVC
- Javascript Free Course with Certificate
- React Free Course with Certificate
- Node JS Free Certification Course
- Data Science
- Python Machine Learning Course
- Python for Data Science Free Course
- NLP Free Course with Certificate
- Data Analysis Using SQL
- Home
- Blog
- Cloud Computing
- SSHing into Ubuntu EC2 instance post blocking port 22 with UFW
SSHing into Ubuntu EC2 instance post blocking port 22 with UFW
By Rohan Singh
Updated on Jul 27, 2018 | 5 min read | 8.7k views
Share:
This blog is in reference to a troubleshooting situation in Amazon Web Services when you have configured firewall setting in your ubuntu ec2 or remote instance and is not able to log in via PuTTY through SSH as the instance. Here, we will see how to insert SSH into the instance in a certain situation when you are logged out of that instance. During the configuration of SSL security, we may accidentally or purposely block SSH for instance to make the instance secure. But what if we again want the same instance to SSH for certain changes? Before proceeding further, read about how to Install Jenkins on Ubuntu.
Before we move further, check out Cloud certifications for more detail on cloud computing. Below is the highlighted configuration of the instance. Here, you can see that all the instances have all ports opened to everything.

Master Right Skills & Boost Your Career
Avail your free 1:1 mentorship session
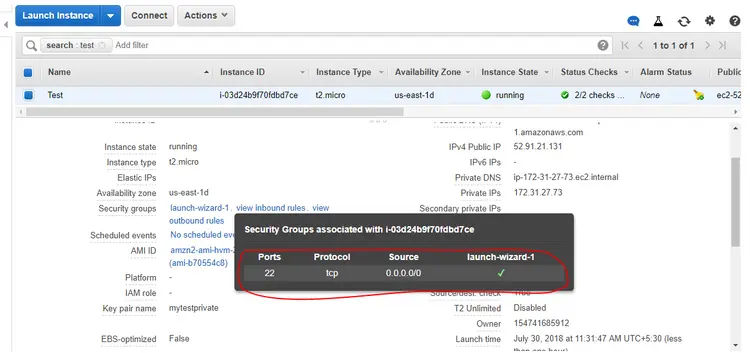
Here are the configuration changes which you have made on the login into instance:
$ sudo apt-get update
$ sudo apt-get install nginx
$ sudo apt-get install ufw
Check UFW Status and Rules
At any time, you can check the status of UFW with this command:
$ sudo ufw status verbose
By default, UFW will be disabled so you should see something like this:
Output:
Status: inactive
If UFW is active, the output will say that it's active, and it will list the rules that are set. For example, if the firewall is set to allow SSH (port 22) connections from anywhere, the output might look something like this:
Output:
Status: active
Logging: on (low)
Default: deny (incoming), allow (outgoing), disabled (routed)
New profiles: skip

To                         Action      From
--                         ------      ----
22/tcp                     ALLOW IN Anywhere


$ sudo ufw deny ssh

$ sudo ufw status verbose

Output:
Status: active
Logging: on (low)
Default: deny (incoming), allow (outgoing), disabled (routed)
New profiles: skip

To                         Action      From
--                         ------      ----
22/tcp                     DENY    Anywhere
If you kicked or logged out of the instance once the changes are done, you will be seeing the below results.
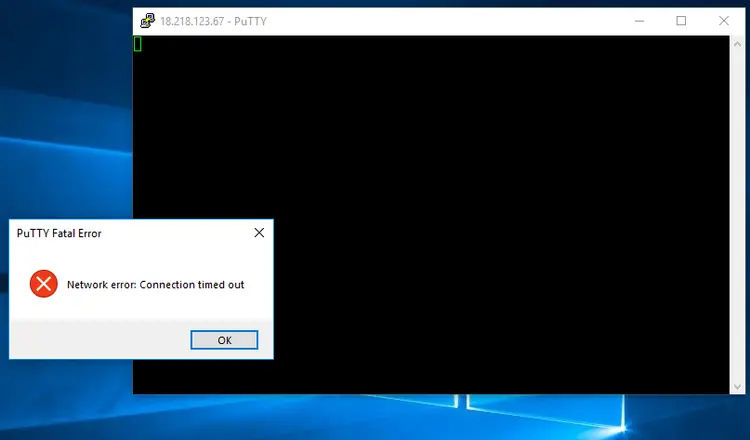
On SSH into the instance with your Public DNS through PuTTY below are the results which you are seeing as an error i.e. Network error: Connection Timed Out
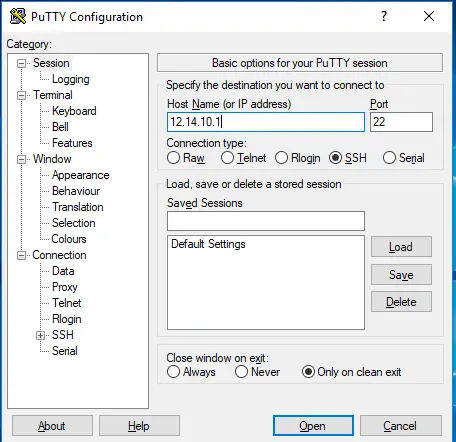
Below error shows that even after all ports were opened outside, the instance is not able to SSH because of firewall software of Ubuntu at the system level. Let’s see how to resolve this kind of system related issue.
Solution to the issue:
Step 1: Take an image of the EC2 instance by selecting the instance ->Image-Create Image
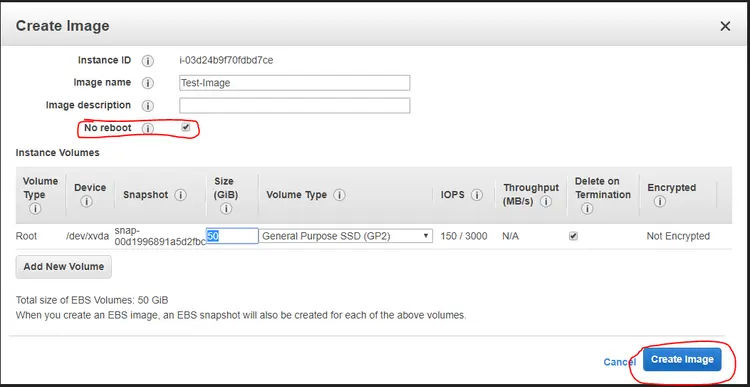
Step 2: Provide specification Image name, tick on no reboot and push the create image button
Step 3: Then Select the image and click on launch

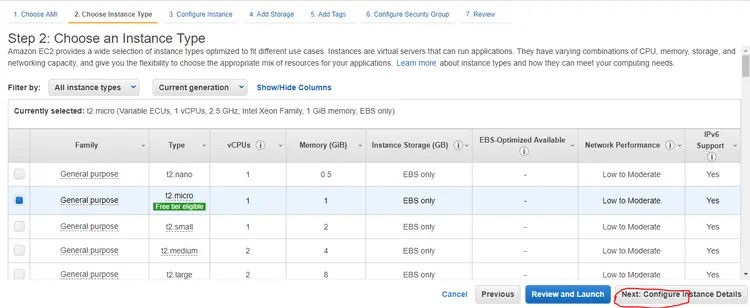
Step 4: Go to instance type, select and click on Next
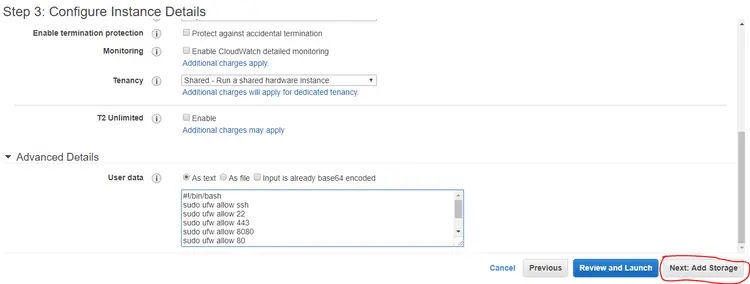
Step 5: In the configuration instance, write the below commands under Advanced Details and click on next:
#!/bin/bash
sudo ufw allow ssh
sudo ufw allow 22
sudo ufw allow 443
sudo ufw allow 8080
sudo ufw allow 80
sudo ufw status
sudo ufw enable
Step 6: Click next and next tab and add security group similar as provided
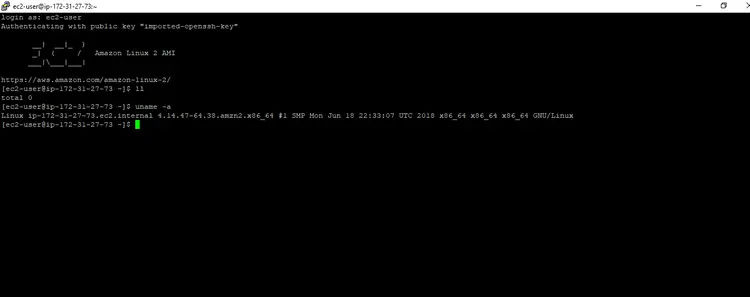
Step 7: Review and launch the instance and then try to SSH to the instance through PuTTY. You will be now able to add SSH inside the instance with this and you can terminate the old instance as the new instance with all the setup same as that of the old instance without any issue except the public IP and private IP change.
Best Practices of Firewall Configuration & Port Blocking:
- Ensure that the Security Groups will allow a specific IP addresses which are within the VPN Range of the Environment.
- Use of NACL for allowing and blocking the IP addresses or subnets for a specific Port by using allow and deny rules. A network ACL contains a numbered list of rules that we evaluate in order, starting with the lowest numbered rule. This helps to determine whether traffic is allowed in or out of any subnet associated with the network ACL. The highest number that you can use for a rule is 32766. We recommend that you start by creating rules in increments (for example, increments of 10 or 100) so that you can insert new rules.
- Use of Bastion Host for accessing critical servers and environments is always a better option to increase the security of the system or environment.
We hope that this article gave you a clear understanding of how AWS services work. You can understand how cloud computing works by making yourself familiar with these services. To learn more about AWS, you can check out the other blogs and the AWS certification course by KnowledgeHut.
Get Free Consultation
By submitting, I accept the T&C and
Privacy Policy
